
Over the years, the modular synthesizer has evolved from a format to create a monophonic synthesizer into an all in one instrument for creating full productions with multiple synth voices, drums, samplers, and effects all at the same time. Whether doing this all in the eurorack or supplementing with external hardware synths or even the computer, a mixer is essential to this workflow.
We are now seeing people perform sets on stages all over the world with their synths. This is where the WMD Performance Mixer MKII's high quality sound with a rugged, tour-ready build quality is absolutely necessary for your mixer.
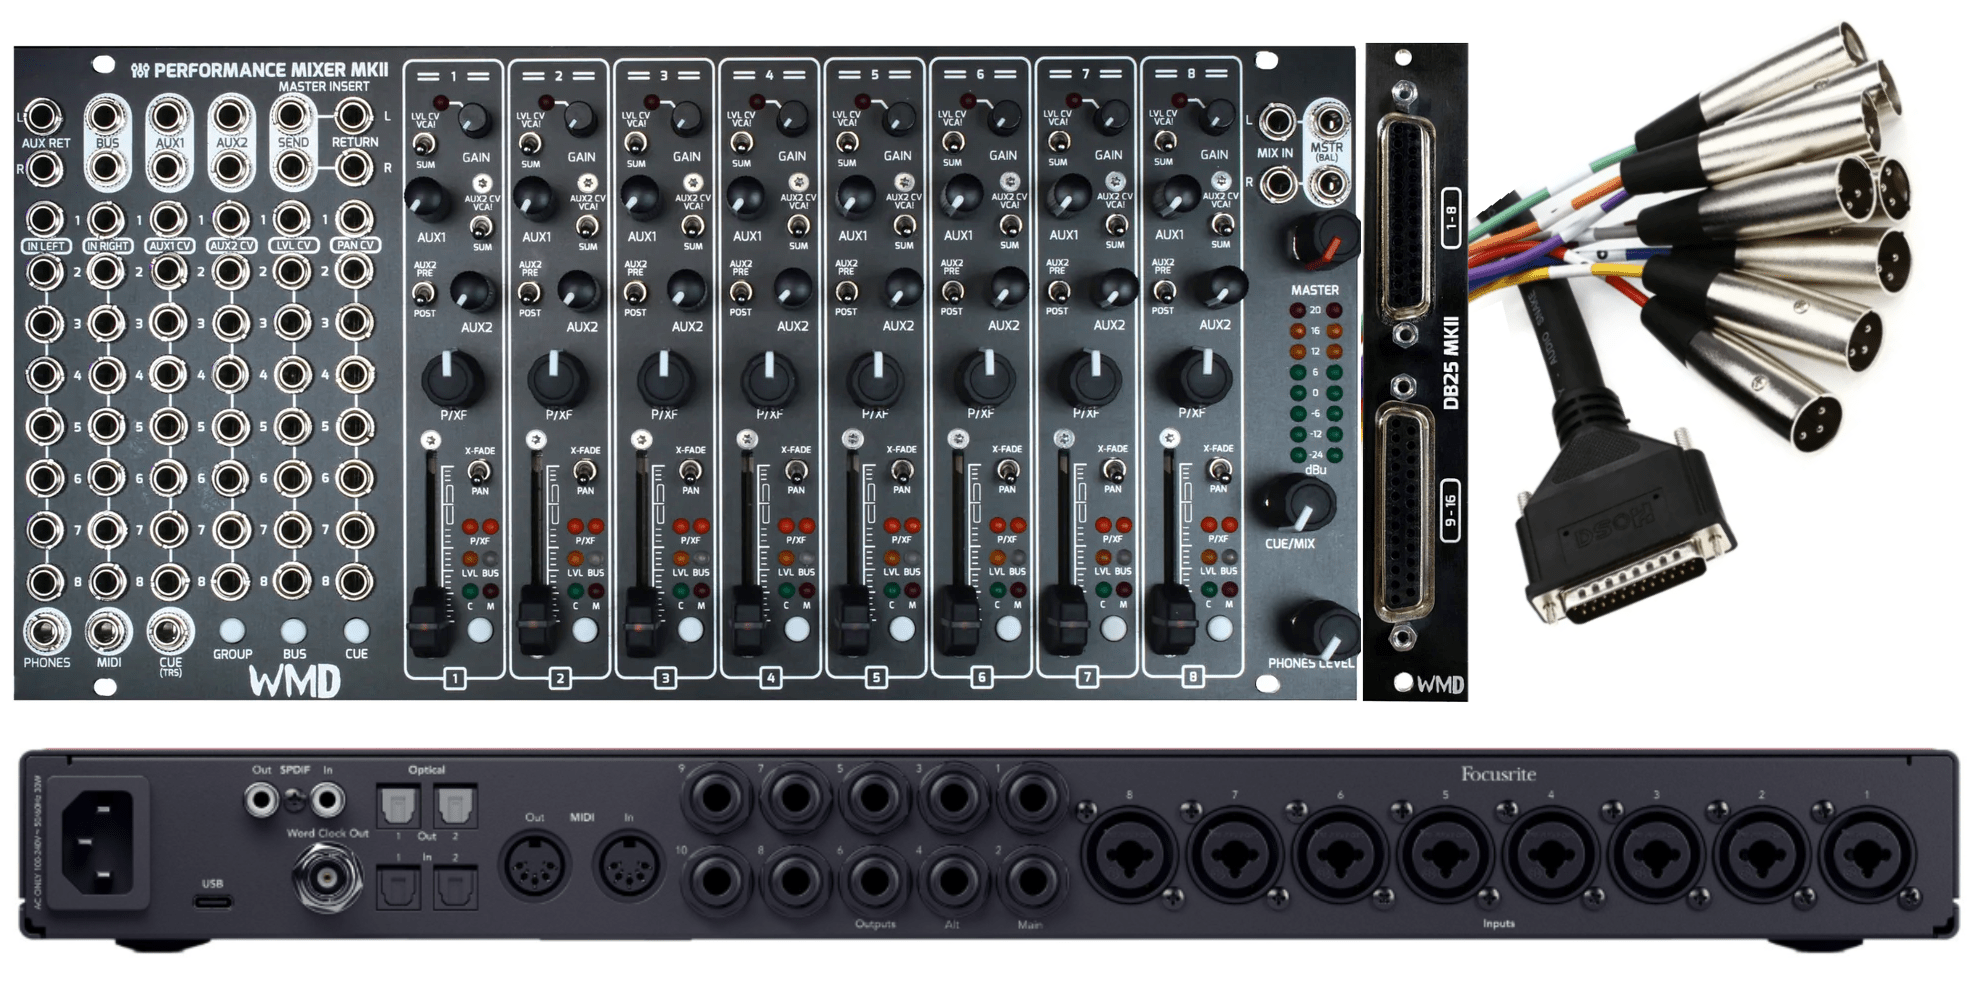
While the mixer is great for live performance, we also wanted to create a seamless experience for working in the studio. Just connect up your DB25 expander to your audio interface or multitrack recorder and you are ready to capture your entire performance in multitrack fashion using balanced outputs via DB25 snakes. This is the guide to help you choose the best interface for multitrack recording your Eurorack using the Performance Mixer Mkii and DB25 MKii.
Concepts of the PM MKII
Pre fader vs Post fader and why there are two sets of headers on the back of PM MKII.
PRE FADER outputs send the audio signal directly after the gain pot and the rear channel insert. These outputs ignore the fader and pan knob position as well as their CVs and send a raw audio signal for each channel. In our opinion, using pre-fader outputs is the best way to capture the audio because it will not capture any mistakes made in mixing and the mix can be re-created in the DAW using automation. This is known as non-destructive recording. If anything needs to be fixed or changed, you have the raw audio to do it. With PM MKII’s MIDI output, you can also record this automation in real time on your DAW, which will save time in editing. Best of both worlds!
POST FADER outputs send the audio signal after the Panning and Fader. This is the same signal that gets sent to the master bus on the mixer. So, with these outputs you can record the performance exactly as you played it, mistakes and all. Post Fader outputs are handy when you want to go from performance to recording quickly with minimal editing. You have the multitrack recording so mixing and processing is still available, but the fades and pan movement get baked into the recording. This can be a little tough for editing after the fact but some users strongly prefer this method of recording in order to cut down the need for editing in post. The Post Fader outputs can also then be used as VCAs for working further within the modular system.
MONO vs STEREO and what comes out of each header.
It is important to note that when recording PRE-FADER outputs, the pan/xfade information is not included, but the stereo image of each channel is preserved if you are using a stereo source. This also means that using a channel in dual mono will not adjust the level of each channel. Again, this is something that can easily be edited in post, but something worth understanding. Recording POST-FADER outputs is post everything, so you get the pan/xfade information. In either case, if you just have one signal plugged into a channel, you will get identical information on both the Left and Right outputs, however panning will change the level of the channels in post fader recordings.
CABLES & SNAKES

What type of DB25 snake cable will I need to connect the Performance MKII and DB25 MKII to my audio interface? Do I need any other cables?
The DB25 MKII will come with all necessary ribbon cables to connect it to the Performance Mixer MKII. Snakes are not included and need to be purchased separately.
As for snakes, this is a common question that we get as different companies have used the DB25 connector for different purposes and created different standards of DB25 connections, which means it is important to buy the right type of snake for your rig.
The DB25 MKII (and MKI for that matter) uses the TASCAM standard for the DB25 connection. This provides enough analogue connections for use with 8 channels of balanced audio per snake. So, to capture all channels correctly, you will need two snakes and 16 analogue inputs on your audio interface or multitrack recorder.

DB25 snakes have a DB25 terminal on one side and then the other side varies depending on the use case. Depending on your audio interface, you may need one that terminates to another DB25 connector, or one that splits the connections to 8x TRS or 8x XLR Male (XLRm) connectors. It is also important to know that the connectors on the DB25 MKII are female, and so are the connectors on most audio interfaces using DB25, so it is important to get cables with male DB25 terminations.
In our opinion, HOSA snakes are great quality for the price. If you can afford something like Mogami, the lifetime warranty is awesome, but we have had great luck with the Hosa snakes over the years and the price is unbeatable.
There are some links below the audio interface section to snakes that we recommend.
What audio interface works best for the DB25mk2?
Brand and quality is really up to you. The important factors to look at is the amount of analog inputs available and what connectors are used. Again, to record each channel of the PM MKII, you will need a total of 16 analog inputs on your audio interface or recorder. You can cut this down to 8 channels if you are only using one mono connection per channel, however, you will still need two snakes for this connection due to how the channels are organized on the connectors.
One other thing to think about is how many outputs there are on the interface. Are you planning to sum your mix with outboard gear? Do you want to run audio out into FX like pedals and eurorack FX and back into the computer? If so, then the number of outputs might be a factor in your decision making.
Many lower budget options top out at 8 channels of onboard analogue inputs, however, they can usually be expanded with ADAT and another of the same interface, or a digital preamp unit that has 8 inputs like the Focusrite Octopre series. ADAT is a universal language and connector, so you can mix and match brands, but if you are buying new gear for this, it is probably best to get matching equipment if the budget allows for consistancy across all inputs.
Here are some examples of different interface configurations.
Focusrite Scarlett 18i20 - this is an 8 input interface that can be expanded by daisy chaining two units together with ADAT. Again, an adat expansion such as the Octopre would also be a good choice as well. The inputs on this one are combo jacks that can take either XLR or TRS connectors. This is a great choice for someone on a budget. It's also versatile in the fact that it has 8 onboard mic preamps, so if you also want use the interface to record sources with microphones such as real drums, vocals, guitar etc. this might be the best choice for you.
Below is an example of how to set up 1x Scarlett, 2x Scarlette, and a Scarlett with an Octopre.
1x Scarlett 18i20 (mono connections)

2x Focusrite Scarlette 18i20

Focusrite Scarlett 18i20 + Scarlett Octopre

Arturia Audiofuse 16Rig - This is one of my favorite new interfaces on the market because it was made for recording electronic music instruments such as synths and drum machines. It makes a perfect match with the WMD Performance Mixer MKII and PM DB25 MKII with its 16 analogue TRS Inputs. No expansion necessary, but with it’s two ADAT inputs, it can be expanded to 32 total channels if you need it. It also has 2 mic preamps, so multitracking a drum set would require more preamps, but if you just wanna record some vocals or guitar or something, it has you covered.
Below is an example of how to set up the Arturia Audiofuse 16rig with the WMD Performance Mixer MKII and DB25 MKII. You will need DB25 to TRS snakes for this one.

Apollo X 16 - This is the most expensive interface I am going to mention, but with the price, you get UA quality and 16 inputs via DB25. With this interface, you just plug 2x DB25 to DB25 cables from the DB25 MKII directly into the interface and you’re good to go. No preamps on this one, so if you want to record microphones with it, external preamps would be necessary.
Below is an example of how to set up the Arturia Audiofuse 16rig with the WMD Performance Mixer MKII and DB25 MKII.

Our hot take on interfaces
It is important to know what you are paying for while looking at interfaces and the drastic price differences between them. The main two things you are paying for is the quality of the preamps and quality of analog to digital converters. Yes, the digital to analog converters as well, however, as we are talking about recording into the computer, I am focusing on the input circuitry.
It is our opinion that the law of diminishing returns does come into play with audio interfaces and while converters and preamps are an essential part of the signal flow, it is okay to consider budget when deciding what is best for you and your set up. A professional studio charging for time needs to have state of the art equipment while at the same time a home studio can pump out quality recordings with a less expensive set up. Plenty of killer records have been made in bedrooms with two channel budget audio interfaces. In 2025, the options are abundant, but the quality of budget options is also pretty steller.
When choosing an audio interface for recording electronic instruments such as eurorack, the preamps matter much less, as the signal is already going to be at an optimal level and does not need to be boosted at all like a microphone. Noise isn’t as much of an issue because of the signal level as well. Sure, preamps can color the sound for good or for bad but with things like synths and drum machines, we tend to prefer to record the cleanest signal possible and then use processing to add color. Right now, the industry seems to agree as most interfaces out there are implementing preamps focused on clarity rather than coloration and very similar if not the exact same analog to digital converters, even across ranges.
You can be as nerdy about this as you choose to be and the choice is up to you. We just tend to focus on the ease of use and hardware features over specs of converters and preamps.
Setting up the DAW.
The first step to setting up your daw is to configure your inputs. It is really helpful to name each input, both the mono and stereo pair configurations in the settings of your DAW. This way, when you create your project and select inputs for your channels, you can see the names and easily make the project. Below is an example in Bitwig.


Next, make a session with 8 tracks and assign your input channels. For this example, we are using all stereo channels, so we just assigned each of the 8 channels to our stereo inputs we created earlier. See below for example.

You can mix and match stereo and mono channels, getting more tracks if you'd like, however, it will take just a little more thought and prep to do so. Just use the mono tracks you created in the system configuration to select what tracks you want to use for what tracks.
MONITORING
It is important to decide how you are going to monitor your mix while recording. The most common way is going to be to monitor the master outputs, however, if youare using all 8 channels of the mixer, you will run out of input channels on your 16 channel interface. You can either burn a stereo pair on the audio interface for the master outputs or monitor with headphones from the PM MKII to get around this.
CREATE A TEMPLATE
Lastly, creating a template is a good idea for quick workflows. All DAWs handle this a bit differently. Bitwig allows you to create multiple templates that you can recall when making a new project. Creating a template just gives you a starting place so you don't have to set up your channels each time you want to record.
HARD DISK RECORDERS
Don’t like the DAW? There are plenty of hard disk recording options out there. Again, it is just important to make sure you have enough ins and outs to fit your desired recording workflow.
Here are some options that we think are cool
CONCLUSION
We hope that this guide helps your journey into multitrack recording with the Performance Mixer MKII and DB25 MKII. Be sure to stay tuned to our blog, social accounts, and YouTube channel for more tips and tricks!


Share:
The State of WMD
Quality Revolution: How WMD Found Its Professional Voice